Thursday, December 31, 2015

2015 in Blogging

Happy New Years Eve!

Since it's the end of the year, I thought I'd post some of my blog statistics!

I started this blog on June 20, and since then have had approximately 5,850 views! The most popular post was Beth's Makeover which was published on September 23, 2015, with 81 total views. Also, I have 16 followers! Thank you so much my followers! :)

Of the 271 total comments, the top three commenters on my blog were:

              Clara from Clara's Craft Corner ~ 31
              Leah M. from American Girl Chick ~ 20
              Emma from Wack-a-Doodle-Dolls ~ 15

Thank you to everyone who has commented on my blog! :) I love getting all your kind comments!

Overall, the statistics show that this has been a great six months of blogging! Now I will share my personal favorite post from each month!

June
 
 
I had a lot of fun making these red, white, and blue cookies from polymer clay and puffy paint for the 4th of July! Day 2 -- Part 2: Star Cookies
 
July
 
 
This photoshoot was a blast! I took Maggie and Beth to the park, and there was a lot of cute photo opportunities. Gladiator Sandals (and Photoshoot!)
 
August
 
 
In August, I got a new doll Beth! I dressed her up and took her to the river. New Doll! Photoshoot
 
September
 
 
This was a hard month to choose a favorite for! I finally decided on a photoshoot I did of Maggie, By the River Photoshoot.
 
October
 
In October, I looked at Target.com to find cool Our Generation outfits. I posted about a few couple and shared my thoughts on them. Some 'Our Generation' Outfits for Inspiration
 
November
 
 
In November I finally decided on a name for Brooke Estelle! At Last...
 
December
 
 
This was a fun post for me, because I enjoyed photographing my dolls doing a fun activity together! Decorating the Gingerbread House
 
I have had a great time blogging this year and am excited for 2016 in the doll blogging community!
 
Happy New Year!


Wednesday, December 30, 2015

American Girl stuff on Ebay

Hey! I just wanted to let you know that today I listed a bunch of American Girl items on eBay. The outfits are in either brand new or good used condition. Click the pictures or the title below the photo to go to the listing on eBay.

(I took these pictures a long time ago, before I had rewigged Beth!)

http://www.ebay.com/itm/-/331743891941?
 
This is a handmade outfit (top and pants). $5.99 starting bid, $9.99 Buy it Now.

http://www.ebay.com/itm/-/331743892405?http://www.ebay.com/itm/-/331743892405?
 
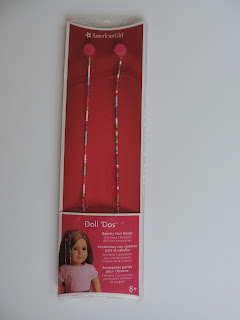
The beach hair beads and dark brown accent clip hair braids. $14.99 starting bid, $20.99 Buy it Now.

http://www.ebay.com/itm/-/331743891875?
 
Pretty Party outfit dress. $7.99 starting bid, $12.00 But it Now.

 
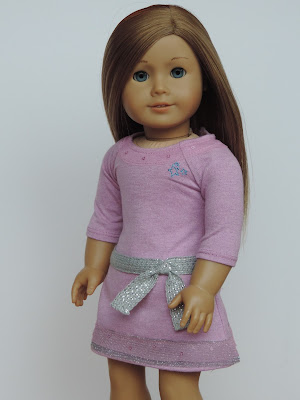
Real Me outfit. $8.99 starting bid, $14.99 Buy it Now.

http://www.ebay.com/itm/-/331743891933?
 
Recital Outfit. $12.99 starting bid, $19.49 Buy it Now.

http://www.ebay.com/itm/-/331743893422?
 
True Spirit Outfit (4 pieces). $10.99 starting bid, $14.99 Buy it Now.


http://www.ebay.com/itm/-/331743891841?
 
Truly Me Outfit. $15.49 starting bid, $22.99 Buy it Now.
 

Star Wars Rey Hairstyle

Last week I was able to see the new Stars Wars movie. Multiple times during the movie I thought 'I should do Rey's hairstyle on my doll!'.
 
I could have done the style on Beth, who has the long dark hair of AG #55, but I did it on Maggie instead. Maggie likes Star Wars and her hair is less thick, I think. This style could probably be done on be done on any doll that has straight or curly hair that is not layered. This hairstyle probably wouldn't have worked well on Brooke, for example. It works on dolls with parts, but ideally it would be done on a parting wig like McKenna's.
 
So here it is!
 
 
To do this style you will need four small rubber bands and a brush. The water is optional, but I did use it.
 
 
Start with your doll's hair down.

 
Take a section from the front.

 
Take it straight back with a rubber band.

 
It should look somewhat like this.

 
Now, take a small wisp of hair from either side just above the ear.


Now do a normal half back. Make sure to only take as much hair as you absolutely need. The rest will be needed to do the other buns.

 
Side view.

 
Twist the rubber band and put the pony tail through again, but stop pulling when the loop is the desired size.

 
Take another section of hair, just below the last one. Include in the second ponytail the leftover hair from the first ponytail.

 
Repeat for the final bun. Use bobby pins to secure flyaways if needed.

 
Final view.

 
Have you seen the new Star Wars movie?


Tuesday, December 29, 2015

Shrink Film Charms

For Christmas, I got some sheets of Shrink Film. ShrinkFilm is cool because when you bake it, it shrinks to about 50% of it's original size. This is great for making jewelry items, like charms.
 
 
I colored the things I drew with Sharpies, but the back of the package says you an other utensils as well.

 
I drew this butterfly and cut it out. The small box I cut with an Xacto knife, so I can put a jump ring through when I make a necklace. I put the butterfly on my ruler cutting board to show how big I drew it.


After baking for 2 minutes at 300F, the butterfly shrunk down to this size! When I took it out of the oven, it was kind of warped. I figured out that if I pressed a metal spatula on it as soon as I removed it from the oven, it would flatten.
 
 
I am excited to make more charms from the Shrink Film, as well as make doll sized utensils. These are the other things I made:
 
 
Have you ever used Shrink Film or made Shrinky Dinks?


Monday, December 28, 2015

New Furry Boots

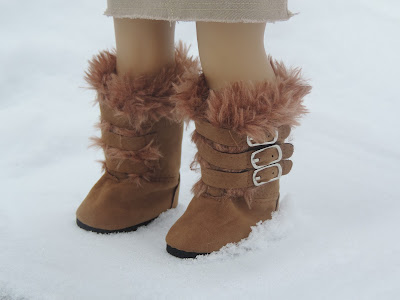
Today I have a photoshoot of Beth modeling a pair of shoes I got for Christmas! They are adorable furry boots with buckles on the side. The buckles close with Velcro. They are from Brittany's.

 
And yes, I had a white Christmas ;)


I think these boots are super cute and they are very good quality. They give the look of a fluffy, furry boot, but have fur only around the top and on the sides in the front.

Sunday, December 27, 2015

How to Make a Doll CD Case!

Today I will show you how I made the AIO CD case that Beth got for Christmas! It's an easy craft that turns out super cute, and you probably have all the needed items already!


Tools I used:

- Xacto knife (to cut the cardboard, but you can also use the scissors to do this)
- Scissors
- Printer
- Paper
- Cardboard
- Glue Stick (or other type of glue, but this worked well for me)
- Masking Tape

 
First, find an image that you would like to use for the front cover of the CD case. I found mine by doing a quick Google search. I was able to find JPEGS of both the front and the back of the CD case. I printed the images to be about 2 inches wide.
 
Also, print a strip of solid color that matches the front cover image. I was able to get the exact color using the eyedropper in Microsoft Paint. The color strip should be 1" by 11", or 2" by 5.5" cut in half down the middle.

 
Cut out the images.

 
Next, trace the images onto your cardboard. I needed to do this three times, so that each piece glued on the next would make the CD case about 3/4 of a 1/4" thick. So, basically, almost 1/4" thick.
 
Glue the cardboard together so you get this:
 
 
Now take your strip of color. It should be about 1" by 11", but I had that was 2" by 5.5", so I just cut it in half down the middle.

 
The other images will cover up the front and back of the cardboard, but the color strip is to cover the sides. Glue the sides of the cardboard square and attach the paper, folded it carefully at the edges.

 
Do this all the way around.

 
The sides are covered!

 
Glue the front cover image to the cardboard.


And the back...

 
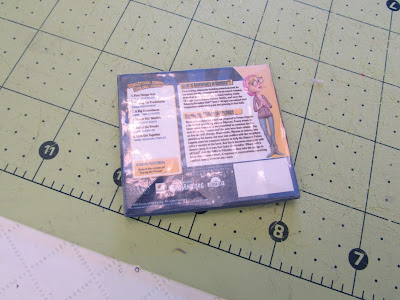
This is optional, but I had an extra copy of the front and back images (which I originally printed to test the size). Therefore, I cut out where it said the title of the album "Taking the Plunge" on the extra copy, and glued it to the side of the CD case to add detail. 


To give it a shiny CD case look, I covered the front and back with masking tape. I laid it sticky side up, then set the album on the tape. I then cut the tape, and then fit it to the size of the image with scissors. Or, you could just cover the sides too, but I just wanted to cover one side, the front, and the back.

 
Finished front with masking tape:

 
Finished back with masking tape:

 
The finished CD!